Search this Blog

Saturday, February 27, 2016

GBC Afterburn ATV Tire Review, Watch them in action!

The Afterburn atv tire is a 6 ply Radial sold by GBC and manufactured in Indonesia.  GBC has been making off-road ATV tires for many years now and hits include the long standing Dirt Devil.  Watch Our Video Review.  Recently we had the opportunity to really push the limits of the Afterburn tire mounted on a solid rear axle Brute Force 650.  Once mounted and trail riding you'll quickly discover that these tires ride very comfortably, much smoother than some of the biased constructed tires we've tested in the past.  Climbing hills with the Afterburn is effortless, they grip well and allow just a bit of spin out so you can keep in the throttle.  One can easily spin around in a doughnut if the situation allows and come back into traction as you release the throttle.  They handle moderate jumps well and land predictably.  Rocks and hard pack are where these tires really shine and chew up the terrain without effort.  They also handle well at high speeds and braking is predictable.  We are big fans of the all around atv tire and these perform about as well as anything we've tested, including the Bighorn 2.0 by Maxxis.  In conclusion we'd say the Afterburn ATV Tire is an incredible choice for a ATV Tire if you're looking for something that is just an all around performer with incredible ride quality.

The Afterburn from GBC Tires is an extraordinarily performing radial ATV tire with unmatched traction on mixed and hard packed terrain.
The semi-aggressive directional tread design promotes superior straight line control and high speed cornering capability.
The lugs are widely spaced to promote traction and cleanout in wet conditions. The 6-ply construction and reinforced carcass design ensure a smooth ride and predictable steering, whether on hard-pack or mixed terrain.
- See more at: http://www.atvtiresbarn.com/gbc-afterburn-atv-tires.html#sthash.ozKmSeiY.dpuf

Thursday, February 25, 2016

How to adjust valves on the Honda 420 Rancher: 2014, 2015, 2016

Adjusting the valves on 2014, 2015 or 2016 Rancher 420 is a straight forward process.  If you're Rancher 420 has developed a tinging or pinging sound or backfires and has no power it's time for a valve adjustment.  It's pretty common to have to adjust the valves on the Rancher at regular intervals.  You'll only need a handful of basic tools and a feeler gauge to get the adjustment completed.  Watch our video of how to adjust the valves by clicking the highlighted text.  To start with you will need to remove the outer plastic that covers the fuel tank and sides of the newer 420 Rancher, this is all one piece.  I would recommend removing the spark plug so finding TDC will be easier.  Remove the pull start block off plate on the rear of the engine (three 10mm bolts).  Remove the 6mm allen head plug located on the side of the engine near the rear foot brake.  Next remove the valve inspection cover caps with a 15/16 wrench.  Check that you have located the "T" on the crankshaft via the 6mm inspection hole.  The crank can be rotated with a 16mm socket found under the pull start rope block off plate.  You must also make sure you're on the compression stroke and this can be verified by making sure there is just a bit of play in the rocker when you find the "T" mark.  If no play in the rockers rotate the engine another 360 degrees to the "T" mark.  Once you're in the correct position loosen the 10mm nuts on the rockers.  Intake is set at .006 and the exhaust at .009  Take you're feeler gauge and place between the adjustment screw and the top of the valve.  Tighten the screw until you feel resistance on the filler gauge.  Now tighten the 10mm nut back down and recheck.  After completing this adjustment on the intake and exhaust reassemble everything.  Start your engine and let it get up to operating temperature.  If you had a tinging or pinging prior to this adjustment it should be gone now.

Wednesday, February 24, 2016

How to find and remove the air/fuel mixture plugs on the Brute Force 650

Can't find the air-fuel mixture screw on your Brute Force 650?  This article and the attached video will explain how to locate and access the caps covering the air/fuel mixture screw step by step.  The air fuel mixture screw is located toward the bottom of the carburetors, but can't be adjusted unless you remove the caps or plugs covering them.  Suppose Kawasaki really didn't want folks adjusting on these BF 650 carburetors.  We were able to remove the caps with a dremel and boring bit.  It would be difficult to accomplish this with a drill bit due to lack of space and the awkward angle.  Bore into the plug only a 1/8 inch or less, hold a light on the plug and you should be able to see when you break through the cap.  Be very careful not to go to far and cut into the air fuel mixture screw.  After drilling the hole on the first cap we attempted to pull the cap by screwing a drywall screw into it, unfortunately the hole bored wasn't exact enough for the screw to bite into the plug.  We then removed more plug material and eventually were able to remove it with a pick.  Although the carb located on the front cylinder is harder to access we were able to successfully remove the cap with the screw method.  Here is a link to the: How to remove cap from BF 650 carb video.
 

Tuesday, February 23, 2016

Kawasaki Brute Force 650 Review and Specs by EVERYTHING ATV UTV REVIEWS

Everything ATV UTV Reviews bashes this 650 Brute Force in an all out big bore test review.  WATCH VIDEO HERE:  Recently I had the opportunity to ride and review the Brute Force 650 with the solid rear axle.  I'm on and off so many different quads that one really has to stand out and this BF will be one review that won't be forgotten.  When you start this V-Twin up you have to ask yourself is this a Brute Force or a Harley Davidson motorcycle, it really does sound that good.  Not only does it have a great exhaust tone, but this thing really has some unique power characteristics.  This power is smoothly put to the ground by it's CVT tranny and breaking the rear tires loose happens easily with a quick stab of the throttle.  In fact the combination of a good suspension, provided by the MacPherson Strut setup and the torque the the v-twin puts out will quickly inspire confidence into even the most novice rider.  Here in Kentucky we have plenty of hills and the BF 650 has the ability to scale steep inclines easily by gaining momentum quickly even in the tightest hole shots.  The Brute Force is capable of
moderate jumps and lands predictably with the solid rear axle.  Breaking is handled through a hydraulic disc setup out front and the rear uses a sealed wet braking system that may never need serviced and just may be the most responsive setup I've came across.  Like many other Kawasaki ATV's the BF 650 provides engine braking through the KEBC, through a electric actuator on the CVT cover.  This quad has a vast gauge readout and covers everything I would consider important.  General service on the Brute Force is straight forward, although more intense jobs like valve adjustment may be better handled by a mechanic.  There were two things about this quad that I felt could be improved upon, the 4x4 Actuator and the carburetors.  The 4WD Actuator is a bit slow engaging and disengaging.  The carburetors work as intended, but the addition of fuel injection would take the hassle out of cold starts.  Two words that describe the Brute Force: Fun & Powerful!

Kawasaki Brute Force 650 4X4 Specifications

  • Engine: Liquid-cooled, 90-degree, 4-stroke V-twin
  • Valve system: SOHC, four valves
  • Displacement: 633cc
  • Starting system: Electric with recoil back up
  • Bore x stroke: 80 x 63mm
  • Compression ratio: 9.9:1
  • Carburetion: (2) Keihin CVKR-D32
  • Ignition: DC-CDI
  • Transmission: Dual-range CVT plus reverse with Kawasaki Engine Brake Control
  • Final drive: 2x4 / 4x4 shaft
  • Frame: Double cradle, tubular steel
  • Front suspension / wheel travel: MacPherson / 6.7 in.
  • Rear suspension / wheel travel: Aluminum swingarm and single shock / 7.2 in.
  • Front tires: AT25x8-12
  • Rear tires: AT25x10-12
  • Front brakes: (2) Dual-piston disc
  • Rear brake: Sealed, oil-bathed, multi-disc
  • Overall length: 86.0 in.
  • Overall width: 47.7 in.
  • Wheelbase: 50.9 in.
  • Ground clearance: At center of chassis, 9.0 / at rear axle, 7.3 in.
  • Seat height: 33.9 in.
  • Lighting, headlights: (2) 45-watt headlights, taillight, brake light
  • Total rack capacity: 264 lbs.
  • Towing capacity: 1,250 lbs.
  • Dry weight: 602 lbs.
  • Fuel capacity: 4.8 gal.
  • Instruments: Speedometer, odometer, dual trip meters, clock, hour meter, fuel gauge, 2x4 / 4x4 indicator light, neutral indicator light, reverse indicator light, low fuel warning light, low oil warning light

Monday, February 22, 2016

How to remove the the carburetors:Kawasaki Brute Force 650 or Prairie 650

This post explains how to remove the carburetor on the Kawasaki Brute Force 650, including what plastics need to be removed.  I'll start by explaining just why I'm removing the carbs for cleaning.  The Brute has a slight miss or cough when at 1/8 throttle.  Other than that it starts as normal with choke and once warmed up pulls hard through the engines entire power range, but still has the hesitation or miss at 1/8 throttle.  The video I've made with this article shows exactly what plastic needs to be removed and the entire removal of the carb, step by step.  Don't be overwhelmed by the thoughts of messing something up, it's really a very straight forward process, but you will need to take your time.  Once all plastic, including the air box is removed you will need to remove several hoses: fuel line, 2 coolant hoses, 2 float bowl drain hoses.  Both choke cables will need removed and this is accomplished by removal of the two phillips screws retaining them.  They will now pull out from the carburetor.  Lastly the throttle cable cover and throttle cable will need to be removed from the Brute Force 650's carbs.  You will now be able to vise the assembly, but be sure to dump the fuel left in the float bowls first.  Now you can remove the float bowls, each retained by four phillips screws.  Once they have been pulled you'll have access to the main and pilot jet of each carburetor.  If your Brute Force is hard to start, won't idle, only runs well with choke on or dies when throttle is applied the problem is likely the pilot jet being clogged.  That being said its a must to go ahead and clean everything now, including all the passages in the carburetor itself with a good quality can of carb cleaner.  In my case this cleaning did not correct my low throttle miss and I will soon be posting a  new article on how to remove the caps covering the air-fuel mixture screws to enrich the fuel mixture.

Sunday, February 21, 2016

How to change rear brake shoes Kawasaki 400 Bayou

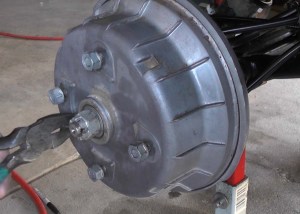
My new video project11_FreezeFrame_6How to install rear brake shoes on the Kawasaki Bayou 400 4x4, 300 4x4, 220 2x4. Watch Video of the complete repair here. Drum brakes are commonly found on the rear of most all sport/utility atv’s.  In fact, even some of the late model Kawasaki’s, Honda’s, Suzuki’s and Yamaha’s still use this type drum brake system.  The Honda Rancher and 220/250 Bayou have even used this setup for the front brakes until recently.  Drum brakes provide a lot of stopping power, but commonly begin to break down over time with mud and water. This particular install was preformed on a Kawasaki Bayou, but the procedure can be applied to most all other makes with drum brakes.  This fix doesn’t require a lengthy tool list to get the job done, but be prepared to get your hands dirty.  For the rear brake replacement you will need the following tools:
  1. 10mm wrench
  2. 17mm socket (lug nuts)
  3. 1 1/16 socket (axle nut)
  4. snap ring pliers
  5. channel lock pliers
  6. wire brush
  7. sand paper or emery cloth
  8. anti-seize
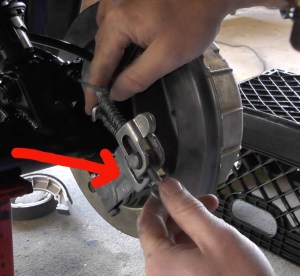
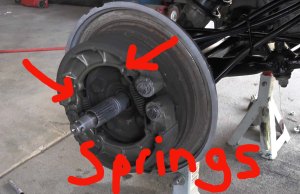
My new video project11_FreezeFrame_4Begin by removing the tire/wheel with 17mm socket.  Remove the brake adjustment wing nuts, there are two of these, one for the foot brake cable and one for the parking brake cable.  Now remove the axle nut and carter pin.  The drum will be the next item to remove, sometimes these can be difficult.  Do not beat on the drum as it is cast aluminum and breaks easily.  If you don’t have a puller try putting the wheel back on for leverage and rotate 1/2 turn while pulling.  Once off remove the snap rings that hold the brake shoes to the pivot point.  Now take the channel locks and position them on the brake spring and remove.My new video project11_FreezeFrame_5  Once both springs are off simply remove the old shoes and clean everything up with a wire brush.  Take sand paper of emery cloth and scuff the inside of the drum up, where the shoes ride.  Before installing the new shoes use anti-seize of the brake shoe pivot points, but DO NOT put anti-seize on the brake shoes where they contact the drum.  Now reassemble in reverse of disassemble.