Search this Blog

Saturday, February 20, 2016

How to replace the oil pump on Kawasaki Bayou 400: Oil pump not working

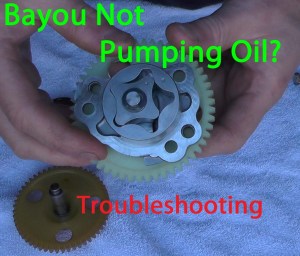
Kawasaki 400 Bayou 4x4 oil pump not working? Replacement of the oil pump on the Bayou 400 may feel like a job the DIY can’t do.  Having just completed the process of diagnosing and fixing the problem I would recommend not to be intimidated by the fix.  It’s actually a straight forward process that after watching the videos above and reading this article you will be able to do.  The longest part of the fix is waiting a couple days for the parts to come in. To start with we will discuss some symptoms or problems that you may have symptoms of before discovering the oil pump has went bad.  Unfortunately Kawasaki didn’t put a low oil pressure light on this quad.
    oilpump
  1. No oil in the oil filter
  2. excessive cam wear due to no lubrication
  3. excessive valve noise, clicking
What else could cause lack of lubrication:
  1. clogged oil line or banjo bolt
  2. faulty oil filter
  3. oil pre screen clogged or broke
Remember that the cylinder and piston is lubricated from oil in the case, so a faulty oil pump will not show symptoms here.  These powerhouses hold nearly 4 quarts of oil, which for a atv of this size is a great thing, as a lot is better than not enough.  As soon as I purchased my used 400 Bayou I changed the oil and found the oil filter to be dry.  Prior to purchasing I did notice that someone had been into the head area by the generic silicone extruding from the head.  Basically I believe the previous owner had the cam replaced due to excessive cam wear caused by lack of lubrication after the oil pump went bad.  There were signs they had pulled the oil pump, but probably missed the problem.  
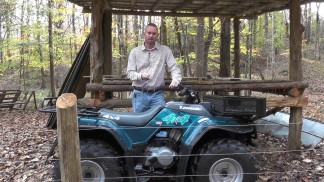
My hands on explanation can be seen in this video.  If your Bayou is still showing peppy off idol response and starts easy you have likely caught the problem before it ruined your cam, a $205 part.
What tools needed to access the oil pump:
  1. 8mm socket with extension
  2. 12mm socket
  3. 1 1/16 socket
  4. 22mm socket
  5. impact driver
  6. impact wrench
  7. something to hold clutch basket for removal, see video
  8. Puller of some type, see video
oil pump parts
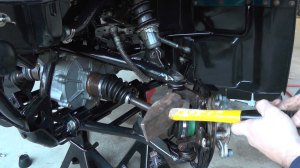
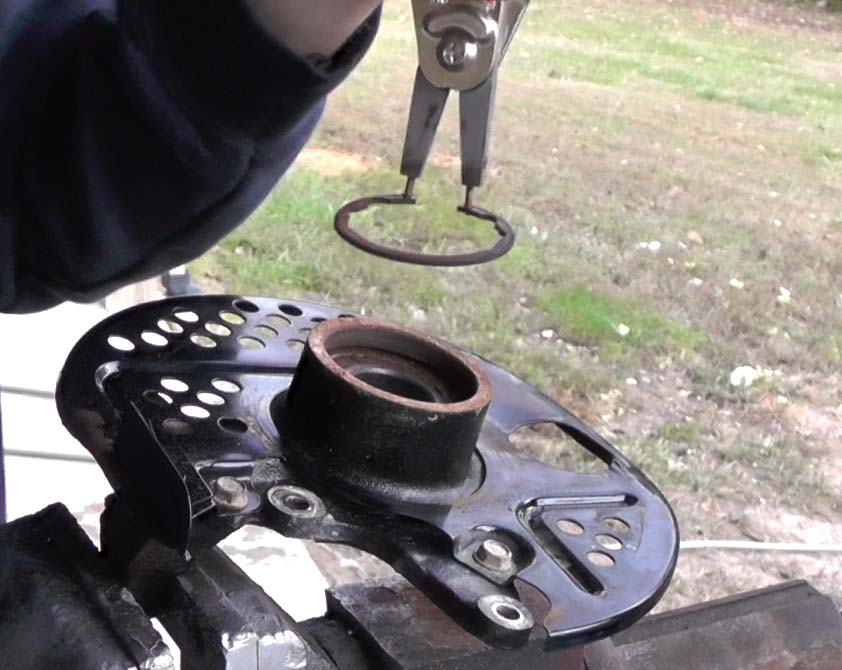
Start by removing all oil from the case and then removing the 8mm bolts around the clutch side of the case.  Remove the foot rest assembly, six 12mm bolts.  Remove outer clutch case carefully.  Remove the 1 1/16 nut on crankshaft, where cintrifical clutch is located and pull clutch with puller (I used a 3 finger puller).  After cyntrifical clutch removed, pull gear behind it off.  Next remove the clutch pack by pulling the bearing in the center out and then using a 22mm socket to remove the nut.  After the nut is removed pull the clutch pack.  Now you 
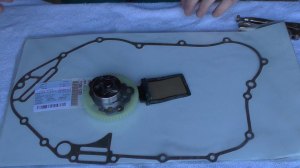
can clearly see the oil pump, a plastic gear, powered by the crankshaft.  Remove the three screws holding the oil pump assembly with a impact driver.  Once the oil pump is pulled out you can start diagnosing the issue.  My total parts bill on this fix was $126.85 and time was approx 2 hours round trip (having to wait 4 days on parts between).

Friday, February 19, 2016

How to remove the rear axle on John Deere Gator 825i, 620i, 855D

Removing the rear axle on a John Deere Gator 825i, 620i, 855D and other Gator models. Taking the rear axle out of a Gator XUV is a project any shade tree mechanic can do at home. Before getting started watch our quick video which explains the axle change and basic tools required.  This how to change axle video on the John Deere Gator will show you step by step how to remove the axle.  This is what you'll have to remove: wheel/tire, brake caliber, brake rotor, knuckle and axle being replaced. Tools for this job include: impact gun, 9mm allen wrench, 1 1/4 socket, 18mm socket, 18mm wrench.  After removing the wheel, remove the brake caliber via 9mm allen wrench.  Next remove the carter pin and axle nut. Take a 18mm socket/impact gun and 18mm wrench and remove the two bolts connecting the a-arms to the knuckle.  To remove the axle, push in on it at the rear end housing and quickly pull out. Have something ready to catch the rear end housing fluid or something to plug it because fluid will dump quickly.  To reassemble, perform that operation in reverse. Replacing the rear axle on the Gator 825i is only a hour or less task.  If your replacing a boot your John Deere Dealer can get these for about $25 on some serial numbered Gators.  To watch our full video of this process simply click this text and you'll be redirected to our youtube channel, EVERYTHING ATV UTV REVIEWS, where John Deere Gator  repair can be found.
   

Thursday, February 18, 2016

John Deere Gator hard to shift FIX 825i 620i 855D: XUV grinds when changing gears


John Deere Gator 825i hard to shift into gear fix, XUV year models 2007, 2008, 2009, 2010, 2011, 2012, 2013, 2014, 2015, 2016. The 825i Gator hard to shift problem fix may also apply to the 550, 560, 590 or 620i although we have not ran across it yet, but use similar CVT clutch designs.  The Gator 825i had to be forced into gear or turned off to get back into neutral.  After adjusting the shift cable linkage and attempting to set the idol down with no results we tackled the primary clutch.  Once the breather hose and eleven 10mm bolts were removed the clutch cover was worked out and down toward the driver side rear tire.  Now we have access to the primary and secondary clutches.  The primary is located toward the front of the engine.  To lube the primary, spray lubricant was applied to the slides.  Then we started the Gator and revved the engine, which cycles the clutch. This process was completed three times and was finalized by rubbing a small amount of motor oil on the slides. After lubing the clutch the Gator began shifting into and out of gear correctly, not binding up and grinding near as bad.  The primary was simply not releasing the belt fully, causing the secondary to spin and bind the transmission when going into gear. Not coming out of gear when the secondary is turning the tranny is what it's designed to do.  Several others have had this same problem with the Gator 825i becoming hard to shift over time, but I have not ran across a permanent solution as of yet. If you want to remove the primary clutch completely you will need to purchase a clutch puller. Some folks have made their own puller out of all thread 9/16 x 18 and grinding or milling down the front.  You can watch the total repair by clicking this link. 

Wednesday, February 17, 2016

How to change front wheel bearings Kawasaki 400 Bayou 4x4

Kawasaki 400 Bayou 4X4 front wheel bearing install: This video shows how to do the install step by step. This job is actually pretty easy to do.  Like most of the other do it yourself fixes, this repair is on a Bayou 400 4×4, but can be applied to most other makes and models.  Before getting started, this is what you’ll need.
    Seal install
  1. 1 1/16 socket
  2. 12 mm socket
  3. 14 mm socket
  4. 14 mm wrench
  5. 17 mm wrench
  6.  rubber mallet
  7.  hammer
  8. snap ring pliers
  9. impact gun
Upper Ball Jointsnap ring removalBearing and seal kits are reasonably priced, most under $30 per side.  Each side requires two bearings and two seals.  Start by removing the wheel and tire.  Next remove the break caliber that is held in with two 12mm bolts.  Remove the 1 1/16 axle nut.  The steering arm must be removed by first taking off the two 17mm nuts and then using a impact gun to remove the two 14mm bolts.  Next the top ball joint 17mm nut can be removed and then strike the spindle, careful not to damage the ball joint.  The bottom ball joint can now be released by removing the 14mm bolt.  Some leverage is needed to spread the a-arms for complete removal of the assembly.  Once off, a bench mounted vise will make the job of removing the seals and bearings much easier.  Seals can be popped out with a screw driver.  Once seals are removed the snap wring can be removed with snap ring pliers.  Now just knock the bearings out, I used a large socket to accomplish this.  To install the bearings I used a rubber mallet, witch really helps to avoid damaging the bearings and seals.  Now just reinstall all the parts and you’re ready to go.  If all goes well during the install, budget about 1 hour of time per side.

Kawasaki 400 Bayou 4x4 Review and Specs

wordpress1As my 400 Bayou 4x4 project comes to a close, I’ll have to say it’s been rewarding breathing life back into this old Bayou King.  After all its been more than 20 years since the 400 Bayou was born and these ATV’s really were one of the boldest offerings of the time.  Having completed my goal of bringing information to folks on this old friend, I’ll leave you with my final video review of the Kawasaki 400 Bayou 4×4.

Kawasaki 400 Bayou SPECS:
Engine
  • Engine Detail : 391cc, Liquid-cooled, 4-stroke, SOHC single cylinder
  • Engine Capacity : 391cc
  • Valve Spec : SOHC
  • Type : 4-stroke
  • Cooling : liquid-cooled
  • No of Cylinders : single-cylinder
  • Bore / Stroke : 81 mm x 76 mm
  • Compression Ratio : 9.0:1
  • Ignition : DC-CDI Electric with recoil backup
Gearbox
  • Transmission : 5-speed, plus reverse
  • Final Drive : Shaft, 4-wheel drive
Fuel
  • Fuel System : Kleihin CVK32
  • Fuel Tank Capacity (Gal) : 3.2 gal.
  • Fuel Tank Capacity (Liters) : 12.11 liters
Dimensions and Weight
  • Length (Inches) : 79.5 in
  • Width (Inches) : 44.5 in
  • Height (Inches) : 0 in
  • Seat Height (Inches) : 31.3 in
  • Ground Clearance (Inches) : 7.3 in
  • Wheelbase (Inches) : 47.2 in
  • Dry Weight (Lbs) : 595.4 lb
  • Length (mm) : 2019mm
  • Width (mm) : 1130mm
  • Height (mm) : 0mm
  • Seat Height (mm) : 795mm
  • Ground Clearance (mm) : 185mm
  • Wheelbase (mm) : 1199mm
  • Dry Weight (Kg) : 270 kg
Suspension, Brakes and Tires
  • Suspension - Front : Dual A-arms, 5.1 of travel
  • Suspension - Rear : Quad-link, 5.1 of travel
  • Brakes - Front : Dual Hydraulic Disc
  • Brakes - Rear : Single Drum
  • Tires - Front : AT24 x 8-11 tubeless
  • Tires - Rear : AT24 x 10-11 tubeless
Carry Racks
  • Rack Capacity - Front (Lbs) : 88 lb
  • Rack Capacity - Front (Kg) : 39.9 kg
  • Rack Capacity - Rear (Lbs) : 154 lb
  • Rack Capacity - Rear (Kg) : 69.9 kg
Towing Capacity
  • Towing Capacity (Lbs) : 1102 lb
  • Towing Capacity (Kg) : 499.9 kg

Tuesday, February 16, 2016

How to take a part and clean the KEBC Fork


Maintaining the KEBC system on you're Kawasaki Brute Force or Prairie 360, 650 or 750 is a easy task.  I'd recommending doing this anytime you replace you're belt, get water in the CVT or have a belt failure.  This article pertains specifically to cleaning and lubing the fork located inside the CVT cover, how to video here.  In a previous article we discussed how to clean the actuator that sits atop this fork.  Its basic function is to apply pressure to primary clutch basket at low speeds and simulate engine braking or hold back.  The fork is held on my a snap ring on the bottom of the mechanism and rides in a collar on top.  Really not much to the disassembly, but I've documented the process in this video.  Once I cleaned everything up, lubed the pivot points of this mechanism, installed a new belt and cleaned/lubed the KEBC actuator assembly the job was complete. Besides better performance and a quieter actuator I could feel and hear a difference when putting it in gear.  The BF didn't lunge any more and no grinding noise.  The system is a bit over engineered in my opinion when compared to other big bore systems like the Kingquad or Grizzly that provide engine braking without the use of all the electronics.  At the end of the day the KEBC system does do what it is intended to do.

How to change Belt Kawasaki Brute Force or Prairie

How to change the CVT belt on a Kawasaki Brute Force or Prairie 360, 650, 750 and possibly other models. VIDEO HERE  If you're performance is starting to diminish or you're just replacing the belt at the service interval this video will take you through the job step by step. Before you get started you'll want to have these tools handy: primary clutch puller tool, impact gun, 19mm socket, 10mm socket, phillips screwdriver and breaker bar. We choose to install a Gates G-Force belt, part# 19G3218. Start by removing the belt exhaust via the clamp located above the CVT Cover. Next remove the eight 10mm bolts retaining the CVT belt cover.  Once the cover is removed you'll be able to see the primary clutch (the one that sits toward the front of the Brute Force). Remove the 19mm bolt, these are reverse threads, so you'll have to tighten it to remove it. Next thread in the clutch puller tool ($23 on Amazon.com) and wedge something in the clutch basket to keep it from turning, careful not to damage the basket.  Next tighten the 19mm clutch puller and you'll hear a pop as the basket releases from the shaft. Pull the basket straight out and over to the provide slack to work the belt off both the primary and secondary clutches.  Install the new belt and perform the process in reverse to complete the job.