 How to clean and fix KEBC actuator motor unit on the Kawasaki Brute Force and Prairie 360, 650, 700 and 750 models. The Kawasaki Engine Brake Control motor actuator sits on top of the CVT belt transmission cover and provides mechanical engine braking by engaging the actuator and then providing force to a fork that in turn forces the primary clutch basket to tighten the belt. The KEBC unit is prone to water and mud and needs serviced more often if you ride in these conditions. Recently I had the opportunity to tear into the KEBC system and give everything a good lube and cleaning. The KEBC actuator motor sits on top of the CVT clutch cover and is taken off by removing three 8mm bolts. The actuator assembly then can be pulled straight up and off. If you plan on cleaning the unit disconnect the electrical connection plug. Once off you can begin disassembling the unit by first removing the three phillips screws on the motor housing. The motor housing will now pull straight upward and you will notice a slight resistance from the magnets inside the housing. To separate the actuator housing remove the phillips screw on the front and simply pull the case apart while wiggling it just a bit. Once inside you'll find a series of three removable metal gears. As routine I've documented this entire how to fix KEBC motor and it's provided here. Watch this video that explains where to apply a light coating of grease for reassembly after everything has been cleaned. The video will also show you how to remove the larger gear that extends through the case. Once reassembled simply reinstall it on the CVT transmission belt cover and you're ready to go!
Saturday, February 13, 2016
How to take a part the KEBC Actuator and Clean
How to clean and fix KEBC actuator motor unit on the Kawasaki Brute Force and Prairie 360, 650, 700 and 750 models. The Kawasaki Engine Brake Control motor actuator sits on top of the CVT belt transmission cover and provides mechanical engine braking by engaging the actuator and then providing force to a fork that in turn forces the primary clutch basket to tighten the belt. The KEBC unit is prone to water and mud and needs serviced more often if you ride in these conditions. Recently I had the opportunity to tear into the KEBC system and give everything a good lube and cleaning. The KEBC actuator motor sits on top of the CVT clutch cover and is taken off by removing three 8mm bolts. The actuator assembly then can be pulled straight up and off. If you plan on cleaning the unit disconnect the electrical connection plug. Once off you can begin disassembling the unit by first removing the three phillips screws on the motor housing. The motor housing will now pull straight upward and you will notice a slight resistance from the magnets inside the housing. To separate the actuator housing remove the phillips screw on the front and simply pull the case apart while wiggling it just a bit. Once inside you'll find a series of three removable metal gears. As routine I've documented this entire how to fix KEBC motor and it's provided here. Watch this video that explains where to apply a light coating of grease for reassembly after everything has been cleaned. The video will also show you how to remove the larger gear that extends through the case. Once reassembled simply reinstall it on the CVT transmission belt cover and you're ready to go!
Friday, February 12, 2016
How to adjust valves on Kawasaki Brute Force or Prairie 650 with Video


Wednesday, February 10, 2016

How to change front axle on Kawasaki Brute Force Prairie 650 with McPherson Strut towers

Monday, February 8, 2016
John Deere Gator 825 Review and Specs

WATCH TEST HERE: JOHN DEERE GATOR 825i
WATCH JUST THE ACTION HERE

John Deere Gator™ XUV 825i Specifications:
Engine
Dimensions
Cargo Box
Tires Front
Tires Rear
| |
Tusk TriloBite Biase 6 Ply ATV Tire Review

How to change ATV rear drum brakes
WATCH VIDEO: Drum brakes are commonly found on the rear of most all sport/utility
atv’s. In fact some of the late model Kawasaki’s, Honda’s, Suzuki’s and
Yamaha’s still use this type brake system. The Honda Rancher and
220/250 Bayou have even used this setup for the front brakes until
recently. Drum brakes provide a lot of stopping power, but commonly
begin to break down over time with mud and water.
 This particular install was preformed on a Kawasaki Bayou, but as
stated before the procedure can be applied to most all other makes with
drum brakes. This fix doesn’t require a lengthy tool list to get the
job done, but be prepared to get your hands dirty. For the rear brake
replacement you will need the following tools:
This particular install was preformed on a Kawasaki Bayou, but as
stated before the procedure can be applied to most all other makes with
drum brakes. This fix doesn’t require a lengthy tool list to get the
job done, but be prepared to get your hands dirty. For the rear brake
replacement you will need the following tools:
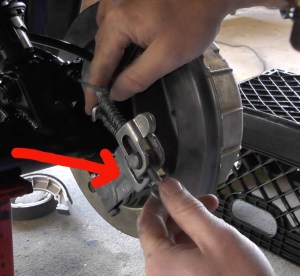 Begin by removing the tire/wheel with 17mm socket. Remove the brake
adjustment wing nuts, there are two of these, one for the foot brake
cable and one for the parking brake cable.
Now remove the axle nut and carter pin. The drum will be the next item
to remove, sometimes these can be difficult. Do not beat on the drum
as it is cast aluminum and breaks easily. If you don’t have a puller
try putting the wheel back on for leverage and rotate 1/2 turn while
pulling. Once off remove the snap rings that hold the brake shoes to
the pivot point. Now take the channel locks and position them on the
brake spring and remove.
Begin by removing the tire/wheel with 17mm socket. Remove the brake
adjustment wing nuts, there are two of these, one for the foot brake
cable and one for the parking brake cable.
Now remove the axle nut and carter pin. The drum will be the next item
to remove, sometimes these can be difficult. Do not beat on the drum
as it is cast aluminum and breaks easily. If you don’t have a puller
try putting the wheel back on for leverage and rotate 1/2 turn while
pulling. Once off remove the snap rings that hold the brake shoes to
the pivot point. Now take the channel locks and position them on the
brake spring and remove.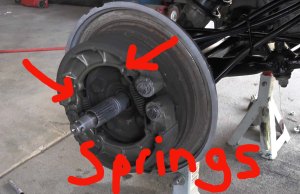 Once both springs are off simply remove the old shoes and clean
everything up with a wire brush. Take sand paper of emery cloth and
scuff the inside of the drum up, where the shoes ride. Before
installing the new shoes use anti-seize of the brake shoe pivot points,
but DO NOT put anti-seize on the brake shoes where they contact the
drum. Now reassemble in reverse of disassemble. MORE BAYOU TECH HERE
Once both springs are off simply remove the old shoes and clean
everything up with a wire brush. Take sand paper of emery cloth and
scuff the inside of the drum up, where the shoes ride. Before
installing the new shoes use anti-seize of the brake shoe pivot points,
but DO NOT put anti-seize on the brake shoes where they contact the
drum. Now reassemble in reverse of disassemble. MORE BAYOU TECH HERE
 This particular install was preformed on a Kawasaki Bayou, but as
stated before the procedure can be applied to most all other makes with
drum brakes. This fix doesn’t require a lengthy tool list to get the
job done, but be prepared to get your hands dirty. For the rear brake
replacement you will need the following tools:
This particular install was preformed on a Kawasaki Bayou, but as
stated before the procedure can be applied to most all other makes with
drum brakes. This fix doesn’t require a lengthy tool list to get the
job done, but be prepared to get your hands dirty. For the rear brake
replacement you will need the following tools:- 10mm wrench
- 17mm socket (lug nuts)
- 1 1/16 socket (axle nut)
- snap ring pliers
- channel lock pliers
- wire brush
- sand paper or emery cloth
- anti-seize

 Once both springs are off simply remove the old shoes and clean
everything up with a wire brush. Take sand paper of emery cloth and
scuff the inside of the drum up, where the shoes ride. Before
installing the new shoes use anti-seize of the brake shoe pivot points,
but DO NOT put anti-seize on the brake shoes where they contact the
drum. Now reassemble in reverse of disassemble. MORE BAYOU TECH HERE
Once both springs are off simply remove the old shoes and clean
everything up with a wire brush. Take sand paper of emery cloth and
scuff the inside of the drum up, where the shoes ride. Before
installing the new shoes use anti-seize of the brake shoe pivot points,
but DO NOT put anti-seize on the brake shoes where they contact the
drum. Now reassemble in reverse of disassemble. MORE BAYOU TECH HERE
Interco Swamp Lite ATV Tire Review and Video
 Interco Swamp Lite TEST: As I wrap the Bayou restoration project up deciding on the right tire for this
classic atv was daunting. There are so many atv tires on the market
today and each claims strength in certain areas. Many of the reviews
on-line are biased, tire brand loyalty is similar to that of Chevy and
Ford truck owners. I decided to go with the Swamp Lite by Interco.
This company has been around for a long time and some of the vehicle
off road tires they came out with decades ago are still top pick among
professional and amateur off roaders. Not only do their tires look
cool, but they perform like advertised and sometimes every better than
advertised. The Bayou came from the factory with 24″ tires, but I
decided to go with 25″ tires. After having them mounted I took them out
for a test run. Pulling heavy loads, up steep hills, in rough creek
bed, on the pavement and on the trail these tires work great. To my
surprise they leave a light footprint on level ground, but when you need
them to hook up they do the job! :WATCH IT IN ACTION:
Interco Swamp Lite TEST: As I wrap the Bayou restoration project up deciding on the right tire for this
classic atv was daunting. There are so many atv tires on the market
today and each claims strength in certain areas. Many of the reviews
on-line are biased, tire brand loyalty is similar to that of Chevy and
Ford truck owners. I decided to go with the Swamp Lite by Interco.
This company has been around for a long time and some of the vehicle
off road tires they came out with decades ago are still top pick among
professional and amateur off roaders. Not only do their tires look
cool, but they perform like advertised and sometimes every better than
advertised. The Bayou came from the factory with 24″ tires, but I
decided to go with 25″ tires. After having them mounted I took them out
for a test run. Pulling heavy loads, up steep hills, in rough creek
bed, on the pavement and on the trail these tires work great. To my
surprise they leave a light footprint on level ground, but when you need
them to hook up they do the job! :WATCH IT IN ACTION:
Sunday, February 7, 2016
SURECAN REVIEW
 Reading through the Nyrocatv.com forum one day I came across a new product. It was a gas jug called the Sure Can and claimed to be a gas can that was spill proof. Doing what we do here at Everything ATV UTV Reviews I decided to order one and test it myself. I went to the surecanusa.com site and placed my order, which totaled $45, including shipping. My 2.2 gallon gas can arrived quickly a couple days latter and I filled it up. I can say it is built well and has a sturdy feel. A nice feature on the Sure Can is the child proof safety cap and my young son has yet to figure out how to remove it. Once the safety cap is removed you simply swing the filler nozzle down into position and squeeze the fill tab on the top. There is virtually no mess filling up your side by side or atv, no mater where the position of the tank is. Its particularly handy when filling up small power equipment like chainsaws, pressure washers, lawn mower, etc. Initially I felt like the can was over priced, but after having it at the garage I always find myself gravitating toward it over my other collection of flimsy and messy gas cans. In conclusion, this may be the best gas can on the market and I do recommend this product, it may be the last one you'll ever have to buy! CHECK OUT OTHER REVIEWS HERE
 Reading through the Nyrocatv.com forum one day I came across a new product. It was a gas jug called the Sure Can and claimed to be a gas can that was spill proof. Doing what we do here at Everything ATV UTV Reviews I decided to order one and test it myself. I went to the surecanusa.com site and placed my order, which totaled $45, including shipping. My 2.2 gallon gas can arrived quickly a couple days latter and I filled it up. I can say it is built well and has a sturdy feel. A nice feature on the Sure Can is the child proof safety cap and my young son has yet to figure out how to remove it. Once the safety cap is removed you simply swing the filler nozzle down into position and squeeze the fill tab on the top. There is virtually no mess filling up your side by side or atv, no mater where the position of the tank is. Its particularly handy when filling up small power equipment like chainsaws, pressure washers, lawn mower, etc. Initially I felt like the can was over priced, but after having it at the garage I always find myself gravitating toward it over my other collection of flimsy and messy gas cans. In conclusion, this may be the best gas can on the market and I do recommend this product, it may be the last one you'll ever have to buy! CHECK OUT OTHER REVIEWS HERE
Subscribe to:
Posts (Atom)