WATCH VIDEO: Drum brakes are commonly found on the rear of most all sport/utility
atv’s. In fact some of the late model Kawasaki’s, Honda’s, Suzuki’s and
Yamaha’s still use this type brake system. The Honda Rancher and
220/250 Bayou have even used this setup for the front brakes until
recently. Drum brakes provide a lot of stopping power, but commonly
begin to break down over time with mud and water.

This particular install was preformed on a Kawasaki Bayou, but as
stated before the procedure can be applied to most all other makes with
drum brakes. This fix doesn’t require a lengthy tool list to get the
job done, but be prepared to get your hands dirty. For the rear brake
replacement you will need the following tools:
- 10mm wrench
- 17mm socket (lug nuts)
- 1 1/16 socket (axle nut)
- snap ring pliers
- channel lock pliers
- wire brush
- sand paper or emery cloth
- anti-seize
Begin by removing the tire/wheel with 17mm socket. Remove the brake
adjustment wing nuts, there are two of these, one for the foot brake
cable and one for the parking brake cable.
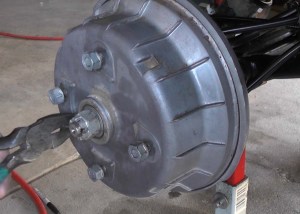
Now remove the axle nut and carter pin. The drum will be the next item
to remove, sometimes these can be difficult. Do not beat on the drum
as it is cast aluminum and breaks easily. If you don’t have a puller
try putting the wheel back on for leverage and rotate 1/2 turn while
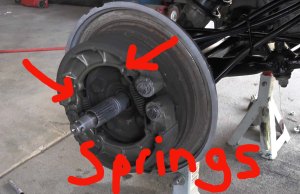
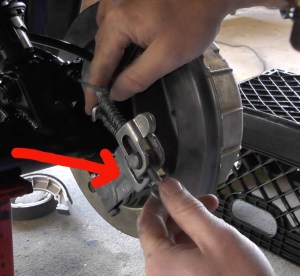
pulling. Once off remove the snap rings that hold the brake shoes to
the pivot point. Now take the channel locks and position them on the
brake spring and remove.

Once both springs are off simply remove the old shoes and clean
everything up with a wire brush. Take sand paper of emery cloth and
scuff the inside of the drum up, where the shoes ride. Before
installing the new shoes use anti-seize of the brake shoe pivot points,
but DO NOT put anti-seize on the brake shoes where they contact the
drum. Now reassemble in reverse of disassemble.
MORE BAYOU TECH HERE
 This particular install was preformed on a Kawasaki Bayou, but as
stated before the procedure can be applied to most all other makes with
drum brakes. This fix doesn’t require a lengthy tool list to get the
job done, but be prepared to get your hands dirty. For the rear brake
replacement you will need the following tools:
 Once both springs are off simply remove the old shoes and clean
everything up with a wire brush. Take sand paper of emery cloth and
scuff the inside of the drum up, where the shoes ride. Before
installing the new shoes use anti-seize of the brake shoe pivot points,
but DO NOT put anti-seize on the brake shoes where they contact the
drum. Now reassemble in reverse of disassemble. MORE BAYOU TECH HERE

No comments:
Post a Comment